Spicy Pumpkin Soup


It's raining! That might not be a big deal where you live, but here in Doha it's an annual event for a few days at most, and today is the first day it is bucketing down. I may not be so excited about it in a few days time when the sandpit turns into a mudbath, but right not - having splashed and danced in the puddles with the little chefs, I'm feeling refreshed and happy.

It also gives me a good excuse to make my favourite spicy soup...

rain  =  winter  =  soup

I've had a pumpkin sitting in the fridge for a couple of weeks waiting patiently for someone to come and fix my oven. I'm giving up on that for now, and taking to the stove-top to turn this...


into this...


it's creamy and delicious with a refreshing hint of south east asia from the ginger and lemongrass, an earthiness from the ground coriander, a robust richness from the coconut milk, and a smidge of heat from the chilli. This is my idea of heaven in a bowl.

Spicy Pumpkin Soup
  • 1 small fresh red chilli, chopped finely
  • 1 teaspoon ground coriander
  • 1 stem of lemongrass, center white part only, finely chopped
  • 3cm of ginger, finely grated (about 1 tablespoon)
  • 1 clove of garlic, minced
  • 2 tablespoons vegetable oil
  • 1 onion, finely chopped
  • 3 cups of vegetable or chicken stock
  • 800 grams of chopped pumpkin flesh (about 1.5kgs pumpkin with skin and seeds)
  • 1 1/2 cup coconut milk
  • 1 teaspoon chopped palm sugar
  • 3 tablespoons chopped coriander

Method


  1. Put the chilli, lemon grass, ground coriander, ginger, garlic and a little stock into a blender and blitz into a paste.
  2. Heat the oil in a large saucepan, add the onion and cook over medium eat for 5 minutesAdd the spice paste and stirfry for another minute.
  3. Add the pumpkin and stock and simmer for 20 to 30 minutes until pumpkin is tender.
  4. Cool slightly, pop batches into a food processer or blender and blitz until smooth (I often freeze this mixture in 2 cup batches, ready to defrost, reheat and add other ingredients).
  5. Rinse out the pan, put the pumpkin puree back in, add the coconut milk, palm sugar and chopped coriander and reheat. Serve garnished with coriander (if the pumpkin is really sweet, leave out the sugar and squeeze in some lime to liven it up).
By the way the photos are before the coconut milk was added. I didn't have any in the pantry, so will reheat the soup later with the coconut milk and coriander.


Baked Cheesecake


Where did October go? What a fun month, with Halloween and two birthdays it's always busy and I don't get much chance to get in the kitchen. I did make two cakes though - a moist vanilla cake for little chef number two, who doesn't like chocolate cake (or icing either), and a rich creamy baked cheesecake for the biggest cheesecake fan ever, hubby. I'll share the vanilla cake another time though do check out the photo, he is a huge Star Wars fan and I loved being able to put this together for him.


And here's the recipe for the cheesecake.

Baked Cheesecake with Berry Topping

For the base
  • 1/3 cup melted butter
  • 140 grams digestive biscuits, crushed
  • 1 tablespoon caster sugar 
For the filling
  • 900 grams of cream cheese
  • 250 grams caster sugar
  • 3 tablespoons plain flour
  • 2 teaspoons vanilla essence
  • 2 teaspoons lemon juice
  • 3 large eggs
  • 200 mls sour cream
For the topping
  • 500 grams frozen berries (I used cherries and strawberries)
  • 1/4 cup white sugar
Method
Combine the digestive crumbs, butter and sugar and press firmly into the base of a 20 inch springform tin, bake for 10 minutes at 180 degrees celsius (350 degrees fahrenheit) to set.

Beat the cream cheese with the sugar for 5 minutes until cream cheese is soft and sugar incorporated. Add in eggs, one at a time, beating well after each addition. Add  the lemon juice, sour cream, vanilla essence and flour and beat briefly until combined and creamy.

Pour the filling into the well greased springform tin, and bake at 180 degrees celsius (350 degrees fahrenheit) for 20 - 25 minutes. Check it for wobble'ness (I'm sure that's a real word, I think.) What you're looking for is a cheesecake that is set around the edges and still a little wobbly in the center. Turn the oven off, but leave the cheesecake in the oven until the oven cools.

Pop the berries into a pan, add the sugar, bring it to a low simmer and cook for 5 minutes stirring frequently. Cool completely and add some cointreau or brandy if you fancy.

Take the cheesecake out of the pan and smother with the berries. YUM!!!!

Red Wine Beef with Coriander Dumplings

I'm tired of waiting for summer to end to cook some hearty winter comfort food. Temperatures are still in the 40's but this week I cooked my first winter stew - Red wine beef with coriander dumplings.


The stews I remember from my childhood were hearty affairs with loads of vegetables, served with a mound of mashed potatoes and peas. I still love the simple flavours in the stews my mother used to cook, but I also like to punch them a bit with wine and herbs. I change out the mash as well with parnsip, celeriac or sweet potato and in this recipe I make some chunky floury dumplings to top it all off. As with any recipe, change things around to suit your tastes, subsititute parsley if coriander isn't your thing, leave out the parmesan cheese if you're not a fan, and add in potatoes or red kidney beans to change the texture.

Is there anything more comforting on a cold winters day (and I chuckle as I write that on a bright sunny Doha day) then a big bowl of stew, some fresh crunchy white bread and a pile of mash.


Red Wine and Beef Stew with Coriander Dumplings
This stew also freezes well, so make two, one in a tinfoil container so it's easy to reheat straight from the freezer.
  • 2 kgs beef chuck steak, cut into 2cm cubes
  • 2 tablespoons olive oil
  • 5 rashers of bacon, chopped
  • 1 onion, chopped finely
  • 3 garlic cloves, minced
  • 2 large tomatoes diced (or 1/2 can diced tomatoes)
  • 2 large parsnips, chopped into 1cm pieces (I used carrots as couldn't find parsnips)
  • 5 cups good quality beef stock
  • 1 cup red wine
  • 1 teaspoon dried thyme (or 1 tablespoon chopped fresh thyme)
  • 1 teaspoon worcestshire sauce
  • salt and pepper to season
  • 2 tablespoons cornflour mixed with 50mls water
For the dumplings
  • 1 1/2 cup plain flour
  • 4 teaspoons baking powder
  • 1/2 teaspoon salt
  • 2 large eggs
  • 2/3 cup milk
  • 5 tablespoons chopped coriander (or parsley)
  • 1/2 cup grated parmesan cheese
Method
  1. Heat half of the oil in a big pot and brown the beef (you might need to do it in two batches), set aside
  2. Heat the rest of the oil in the pot and fry the bacon (you lucky thing), onions and garlic for  few minutes
  3. Add the beef back in with the parsnips, wine, beef stock, thyme, tomatoes and worcestshire sauce. Cook stove top on a low heat for 1 hour.
  4. Thicken with the cornflour and water mixture. Cook for another 10 minutes, and season with salt and pepper - transfer the beef mixture to a casserole dish.
  5. To make the dumplings - whisk together the milk and eggs, and add the herbs. Sift flour, baking powder and salt into a bowl, then add the egg mixture and parmesan and stir. The mixture will be quite sticky.
  6. Put teaspoonfuls on top of the stew about 1cm apart and bake in the oven at 180 degrees celsius (350 degrees fahrenheit) for 15 minutes until dumplings are puffed up and golden on top. Serve quite simply in bowls with some crusty french bread to mop up the sauce.

Arggghhhh...school lunches!!!

The kids are back at school and I'm determined not to let the school lunches overwhelm me. Last year I spent many an evening staring blankly at the fridge, wiggling my nose, or clicking my heels in the hope that I could magic up a filling and nutritious lunch for the little chefs. Instead, lunch invariably included yoghurt, a piece of fruit, some crackers and the inevitable vegemite sandwich. Filling - check, Nutritious - check, Boring - most definately check.

So this week I started a new regime, they still get the sandwiches and yoghurt a couple of times a week, but on the other days I mix it up a bit. This week I made a fabulous quinoa, sweetcorn and black bean salad, which they both ate or at least made an attempt to try. Quinoa is my new favourite no fat, high fibre, seriously protein rich carbohydrate - it has all of the essential amino acids that our  body requires. I'm surprised there was any left for the kids as I made it at lunchtime and scoffed half of it straight out of the pan.

I also baked some easy high fibre pear and apple muffins and popped them into the freezer in bags of 4 so they'll always have a treat in their lunchbox too.

I'm feeling very virtuous right now and determined to keep it up.

Sweetcorn, Black Bean and Quinoa Salad

You can put different vegetables into the salad if you like, it's fab with some pomegranate seeds and pinenuts as well and I quite often spice it up with a pinch of chile pepper (though not for the kids)
  • 1 teaspoon vegetable oil
  • 1/2 large red onion, chopped finely
  •  ¾ cup uncooked quinoa
  • 2 cloves of garlic, chopped
  •  400 mls vegetable or chicken stock
  • 1 teaspoon ground cumin
  • 1 cup frozen corn kernals
  • 1 can black beans, rinsed and drained
  • ½ cup chopped coriander
  • 3 spring onions, chopped finely
  • juice of a lime
  • Salt and pepper to taste
Method
1.       Heat the oil in a pan over medium heat, sauté, garlic, onion, and cumin for 5 minutes until onion is softened.
2.       Add quinoa and stir to coat, Add vegetable or chicken stock, and simmer covered for 20 minutes, add frozen corn and simmer uncovered for an extra 5 minutes
3.       Remove from heat, add in black beans, spring onions and coriander. Season with salt and pepper, squeeze in lime juice, mix and chill overnight.

Wholemeal and Rolled Oat Apple Muffins
·         1 egg
·         ¾ cup low fat milk
·         ¼ cup vegetable oil
·         1/3 cup sugar
·         2 medium apples, peeled, cored and grated
·         1 cup raisins or sultanas
·         1 cup wholewheat flour
·         1 cup rolled oats
·         1 tablespoon baking powder
·         ½ teaspoon nutmeg
·         ¼ teaspoon salt
·         2 teaspoons ground cinnamon
Method
  1. Beat oil, milk, egg and sugar together and add grated apples
  2. Mix dry ingredients, included dried fruit together
  3. Fold wet ingredients into dry carefully, don't over-mix as muffins can be tough
  4. Put into muffin tins or cases and bake at 180 degrees celsius (350 degrees fahrenheit) for 15 to 20 minutes until a skewer inserted comes out clean.


Meringues for the Little Chefs


I was making some aioli this week and had egg whites left over, and what do you do with egg whites? Make the little chefs favourite treat - 'white cookies'. They really aren't white cookies, they're meringues, but the kids have always called them 'white cookies', so that's what they'll always be.

Meringues are easy to make, just a simple combination of sugar and egg whites. The trick is to beat the egg whites long enough for the sugar to completely dissolve, and to bake them at just the right temperature to get a blindingly white crisp hard shell and a delicate chewy texture in the middle. I baked mine on an extremely humid day (aren't they all in Doha at the moment), so cooked them for 30 minutes longer than the recipe suggests. I also like to make small meringues (about 5cm wide), but I make larger ones for dinner parties and serve them individually, loaded with freshly whipped cream and a mixture of berries.

Here I've served them with a raspberry & yoghurt puree, and fresh red currants, because that's what was in the fridge and I was too lazy to make my favourite combination - whipped cream with home-made lemon curd.


Meringues (White Cookies)
  • 4 medium egg whites (about 90 grams)
  • 150 grams caster sugar
  • 1/2 teaspoon cream of tartar
Method
  1. Heat the oven to 150 degrees celsius
  2. Beat the egg whites with the cream of tartar until they form soft peaks
  3. Add the sugar a tablespoon at a time, beating well between each addition, once the last sugar is added keep beating until the egg whites are thick and glossy and form stiff peaks, and there is no 'grittyness' in the texture.
  4. Line a baking tray with parchment paper and place spoonfuls on the baking paper (use two spoons, it's easier) or fill a piping bag and pipe the meringue onto the baking tray
  5. Lower the oven temperature to 100 degrees celsius, and cook for 90 minutes (about). Meringues should be crisp on top, but still white (if they start to colour during the cooking, lower the heat by 10 degrees).
  6. Turn the oven off, and leave the oven door slightly ajar, let the meringues cool completely in the oven, a few hours, or overnight to dry out. Serve with cream, yoghurt or icecream and fresh fruit.

Asam Masak Merah (Tomato Chicken Curry)


Ok, so I'm taking a lot of license in calling this dish Asam Masak Merah. The traditional dish is usually prepared for special occasions like EID as part of a feast, it's spicy, crunchy, creamy and smells divine. My version is a creamier version, still with all the lovely fragrance and spice of the original, prepared quickly and served with lashings of spicy creamy sauce to spoon over the rice or mop up with flaky roti bread.

I've tweaked the recipe a little to make it easier to prepare, and most importantly I don't deep-fry the chicken first, which is the traditional way of preparing the chicken, and by far the tastiest as well - but adds a bit of time to preparing the dish. Don't shoot the messenger if this isn't what you're used to in this dish, but do try it as it's one of my favourite Malay curries.

I love cooking curries using chicken on the bone - the chicken stays moist and the marrow in the bone infuses a wonderfully earthy chicken flavour into the dish. Lately, I've taken it one step further and use a whole chicken which I cut up myself - finding good quality chicken pieces in Doha is not easy, and chopping the chicken makes me feel quite 'chefy' and a brings out the inner Hunter Gatherer in me.


Asam Masak Merah
Curry Chicken in a Tomato Sauce
  • 1 whole chicken cut into pieces
  • 1 tablespoon turmeric
  • 1 teaspoon salt
  • 2 tablespoons vegetable oil
  • 10 large dried red chillies, soaked in water
  • 3 cloves of garlic, chopped
  • 2 large shallots, peeled and halved
  • 5cm piece of ginger, peeled and sliced
  • 2cm piece of galangal, peeled and sliced (optional)
  • 2 stalks of lemongrass, inner white bits only, chopped roughly
  • 5cm cinnamon stick
  • 2 cloves
  • 2 star anise
  • 4 cardamom pods, bruised
  • 420 gram can chopped tomatoes
  • 420 gram can coconut milk
Method
  1. Rub the chicken pieces with the turmeric and salt and set aside for 30 minutes
  2. Pop soaked chilies, shallots, garlic, ginger, galangal and lemongrass into food processor with a little oil and blitz until it becomes a paste (alternatively use a mortar and pestle)
  3. Heat the vegetable oil in a pan over medium high heat. Cook the cinnamon, cloves, cardamom and star anise for a few minutes until fragrant, add curry paste and cook until paste changes colour and oil starts to separate from the mixture.
  4. Add chicken pieces and brown in the spices on both sides to seal
  5. Add tomatoes and coconut cream, turn to low, and simmer on low heat covered for 45 minutes until chicken is cooked, stirring occasionally
  6. Serve with roti and rice

Layered Raspberry and Lemon Cheesecake

Cheesecake is one of my favourite desserts, I love the creaminess of the filling, teamed with the crispy crunch of the base and a lovely tartness in the topping.

I stumbled across the fabulous The Italian Dish recently, and this week she made little cheesecakes in jars. In a previous post she also made a cheesecake parfait in glasses. I fancied a dessert last night, but didn't want to spend hours mixing and baking a cheesecake, so I followed her idea and deconstructed a no bake cheesecake and served it in jars (because how cool is that). I used fresh raspberries and loaded up the cheesecake with lemon juice, and used wholemeal digestive biscuits for the crumb mixture, and it was a little jar of decadence. It would also be fabulous with strawberries or other berry fruit. I'm going to experiment with the idea and try a caramel sauce and grated chocolate version with Baileys in the cheesecake mixture instead of lemon. Then it will definately be time to get back on that treadmill.


Layered Raspberry and Lemon Cheesecake
  • 200 grams wholemeal digestive biscuits
  • 1/4 cup melted butter
  • 400 grams cream cheese
  • 1 cup sour cream
  • 1/2 cup caster sugar
  • juice of 2 lemons
  • 400 grams raspberries
Method
  1. Crush the biscuits into crumbs using a food processor or by hand and mix with the melted butter
  2. Sprinkle the raspberries with a little sugar and mash slightly, set aside
  3. Beat the cream cheese and sugar together until smooth and creamy, add the lemon juice and sour cream and beat a bit more
  4. Put a layer of crumbs in the bottom of a jar or glass, top with some cheesecake mixture then with a spoonful of raspberries, repeat the layering until you get to the top of the jar, and finish with a sprinkling of the biscuit crumbs.

Crumpets anyone?


I'm bored! And no, that's not the children saying it, it's me. One good thing about boredom though is I tend to experiment in the kitchen. So the other day I was walking around Lakeland (you brits will know it - for others, it's a kitchen shop with loads of gadgets and cooking stuff), and I saw crumpet rings. I'd never even considered that crumpets were something you could make, rather than spend a small fortune on imported ones. How much fun to try though....so I bought the rings.

I googled the recipe and cobbled together a bowl of batter based on a couple of good recipes. There is something very satisfying about seeing a lovely yeasty batter, oozing and bubbling like it's alive - which I guess in a way it is.

I heated a frying pan with the crumpet rings in it, well greased (important point), and starting cooking. The first batch didn't quite work out, the batter was too thick and they didn't have the lovely holes that crumpets should, so I added a little bit of water to the mixture. Too much it seemed as the mixture ran out under the rings. So I added some more flour back in (this could have gone on for a while), and whisked and the next batch were perfect.

They do take a little while to cook, but the result is worth it - light, crunchy golden brown goodness. The first one didn't even make it to a plate, I just globbed on the butter and devoured it while standing at the oven cooking some more. I was a little more refined with the next few, and ate them drizzled with golden syrup. The recipe made about 16, so I've popped some in the freezer to toast for brekkie tomorrow, I can't wait!


Crumpets
  • 450 grams white plain flour (if you have bread flour, replace half of the plain flour with that)
  • 1/2 teaspoon cream of tartar
  • 1 teaspoon salt
  • 2 1/2 teaspoons dry yeast
  • 1/2 teaspoon sugar
  • 1/2 teaspoon baking soda
  • 300mls lukewarm milk
  • 300mls lukewarm water
 Method
  1. Sift together the flour, salt and cream of tartar.
  2. Mix the milk, water, sugar, baking soda and yeast together and set aside for 5 minutes to become frothy
  3. Pour the liquid into the flour and mix well with a whisk. Cover with plastic wrap and set in a warm place for an hour. Give the batter a stir and you're ready to cook.
  4. Heat a frying pan over medium low heat for about 5 minutes to heat fully, pop the well greased crumpet rings into the pan for a minute, then spoon in the batter. The batter will be thick, but shouldn't be too thick. Within a minute or so, little bubbles should have appeared on the surface of the crumpets, if not, the batter is too thick and you need to add a little water.
  5. Cook the crumpets for about 12 to 15 minutes, you can remove rings once they're set (about 5 minutes) and pop them into another pan to speed up the cooking process. Once the crumpets are cooked, flip them over and cook the top side for 2 minutes or until it is a nice toasty golden brown. Enjoy!!

Balsamic Caramelised Onion and Goats Cheese Pizza


It's Ramadan and a time for muslims to fast and reflect. As a non muslim in Qatar during Ramadan, it's a lovely lazy hazy time, as there isn't much happening during the day, and to be honest, at 50 degrees it is getting too hot to do more than pop out to the supermarket once a day for supplies, or dive into the pool to cool off. That means a lot of time indoors.

The little chefs are busy doing craft, playing the Wii or turning cushions, blankets and chairs into houses and forts, which leaves me plenty of time to indulge myself in the kitchen cooking up a storm, including cooking some freezer meals for the Green Box to deliver. Today I used their lovely goats cheese - you can order it online at http://www.thegreenbox.me/, along with their fabulous hormone free chickens and quality fruit and vegetables.


I love goats cheese - on it's own with crackers, in a cheesecake, where it adds a sharp tangy loveliness, or mixed with cream cheese, parmesan, herbs and nutmeg, popped on top of portabello mushrooms and grilled to cheesy perfection.

My favourite way to use it is in a tart or on a pizza, paired with some caramelised onions, and that's what the Green Box customers are getting today. I'm using chapati flour, as it's a lot less refined than white flour and creates a nice chewy base that crisps up well.

Caramelised Onion and Goats Cheese Pizza

This makes two large thick crust pizzas - for thin crust, use less yeast. I like to prebake the base for 5 minutes before putting the topping on - the onions can be a bit moist and I hate soggy bases.

Pizza dough
  • 4 cups of wholemeal or plain flour (or a combination of both)
  • 400mls of slightly warm water
  • 3 teaspoons dried yeast
  • 1 teaspoon sugar
  • 1/4 cup olive oil
  • 1 teaspoon salt
Caramelised Onions
  • 3 large white or brown onions, sliced
  • 2 tablespoons olive oil
  • 1/4 teaspoon salt
  • 2 tablespoons brown sugar
  • 2 tablespoons balsamic vinegar
Goats Cheese
  • 300 grams Goats Cheese with Herbs or 300 grams plain goats cheese mixed with 1/2 teaspoon each of thyme and oregano
  • Olive oil to drizzle
  • freshly ground black pepper

Method
  1. To caramelise the onions, heat the oil in a large pan over low heat, add the onions and cook slowly, stirring occasionally for about 20 minutes. When the onions are translucent, add the sugar and balsamic vinegar. Turn the heat up to medium and stir frequently for about 10 minutes until the mixture is rich and caramelised. Watch it while it's cooking as it can burn once the sugar is added.
  2. To make the dough, mix the water, sugar and yeast together and let stand for a few minutes until starting to froth. Put the flour, salt and olive oil in a stand mixer fitted with a dough hook (or into a bowl, just get ready to exercise those arms).
  3. Add the yeast mixture to the flour mixture and mix. The dough should be moist, not dry, but not too sticky. Knead using the mixer, or by hand until the dough is smooth and elastic (if you poke it with your finger, it'll spring back into shape quickly). Have I mentioned before how much I love my Kitchen Aid.
  4. Pop this into an oiled bowl, cover with plastic wrap and leave for an hour or two to rise. Check out just how much it will rise.
  5. Heat the oven to 200 degrees celcius (400 degrees fahrenheit), put an upside down baking dish, or pizza stone in the oven and heat for 10 minutes.
  6. Roll half the dough out to about 0.5cm thick. Bake in the oven for 5 minutes
  7. Remove from oven and spread with half the caramelised onion mixture, crumble the goats cheese on top, season with freshly ground black pepper and drizzle on a little olive oil. Bake for 15 minutes till base is crisp and cheese is a delicious golden brown.

Rhodes - Yummm!


I couldn't come up with a witty title, that takes too much thinking time, when we're only here for a week and it gets in the way of eating time. Rhodes is a typical mediterranean island, with it's emphasis on vegetables, fresh fruit, olive oil, pulses, grains, fish, poultry and little red meat is a diet low in saturated fat and rich in vitamins and healthy omega 3’s. The benefits of a Mediterranean diet are heralded in a number of studies, the most famous conducted by Harvard University’s school Public Health in the 1990s. Rhodes, part of the Dodecanese Island groups, showcases the best of Greece in terms of the Mediterranean diet and is part of an awesome Aegean Cuisine initiative - a campaign by the Dodecanese and Cyclades Island groups to highlight and protect the traditional foods of these islands.

We took a tour around the island with Nicklos, an Egyptian born half Italian/half Greek Rhodian who has lived in Rhodes for 20 years - how's that for multicultural. Driving through the countryside, we were amazed at the vast number of olive trees. Nicklos proudly shared that Greeks consume more than 18 litres of olive oil per year (seriously! I googled it to check), compare that to what is thought of as the olive oil capital of the world Italy where the amount is roughly 9 litres per person.

Rhodes is a large island, with 220 kilometres of coastline, so it is not surprising that seafood features as a nightly dish here.  Most common are fish like grouper, sea bass, and red snapper, sometimes cooked in sauces, but mostly grilled whole, drizzled with olive oil, freshly squeezed lemon juice and served with a fresh garden salad. A Rhodian favourite is to sandwich freshly sliced tomatoes, green pepper and oregano between two slices of feta cheese, wrap well in tinfoil and pop onto the grill while the fish is cooking, turning it often. What results is a beautiful creamy, salty, sweet (from the tomatoes) and fragrant dip that is fabulous with the fish and freshly baked bread.

We popped into a traditional Greek Taverna in the old city of Rhodes for lunch and were served a vast and varied Greek platter full of traditional dishes including Mezedes. Similar to Mezes in the Middle East or Tapas in Spain, Mezedes are a variety of small dishes. Our platter held some fabulous dishes like taramoe salad (a delicate fish roe spread), melizanosalata (a smoky aubergine salad), dolmadas (stuffed vine leaves dripping with olive oil and fresh lemon juice), keftedes (tender beef and lamb meatballs) and saganaki (creamy baked feta). There was also a hearty helping of olives, greek salad, tzatziki (creamy cucumber dip) and a glorious melt in your mouth Moussaka (a cheesy beef, tomato and aubergine dish).

We're loving Rhodes, it's a beautiful island with so much to offer - thousands of years of eventful history (I still can't figure out who 'controlled' Rhodes and when), super-friendly locals, crystal clear seas, fantastic scenery, and absolutely fabulous food, cooked simply and perfectly, using the freshest ingredients.


Keftedes with Tzatki

·         4 slices white bread, torn into pieces
·         2 tablespoons milk
·         1 clove garlic, minced
·         1 onion, quartered
·         2 tablespoons fresh mint
·         1 teaspoon salt
·         ground black pepper to taste
·         250 grams minced beef
·         250 grams minced lamb
·         3 eggs
·         1/2 cup flour for dredging
·         vegetable oil for frying

Method

1.    Moisten the bread pieces with the milk in a large bowl, and set aside.
2.    Place garlic, onion, mint, salt, and pepper. Process until the onion is finely chopped. Add the onion mixture to the bowl with the moist bread, along with the beef, lamb, and eggs. Mix with your hands until thoroughly blended.
3.    Roll the mixture into balls measuring 4 to 5 cm in diameter. Place the flour in a shallow pan, and roll the balls in the flour to coat. Shake off any excess flour, and place the meatballs onto a plate or baking sheet, pressing to flatten slightly. This will keep them from rolling away.
4.    Heat 2cm of oil in a large skillet over medium heat. Add the meatballs, 8 or 10 at a time, and cook until nicely browned on the outside and no longer pink in the center, about 10 minutes; drain on a paper towel-lined plate. Repeat with remaining meatballs. Alternatively, place the uncooked meatballs on a lined baking tray, spray with oil and bake for 15 minutes at 180 degrees Celsius, turning once.

Tzatziki

·         3 tablespoons olive oil
·         1 tablespoon vinegar
·         2 cloves garlic, minced finely
·         1/2 teaspoon salt
·         1/4 teaspooon white pepper
·         1 cup greek yogurt, strained
·         1 cup sour cream
·         2 cucumbers, peeled, seeded and diced
·         1 teaspoon chopped fresh dill

Method

1.    Combine olive oil, vinegar, garlic, salt, and pepper in a bowl. Mix until well combined.
2.    Using a whisk, blend the yogurt with the sour cream. Add the olive oil mixture to the yogurt mixture and mix well.
3.    Finally, add the cucumber and chopped fresh dill. Chill for at least two hours before serving.

Filling the Biscuit Tins

I was born in the wrong era. I should have been born in the 50s when donning a frilly apron and spending all day in the kitchen baking was the way to fill the biscuit tins.
 
I have really fond memories of baking day with mum. Once a week she'd pop the oven on, get out her lovely old kenwood mixer with porcelain bowls and start mixing. At the end of it she'd have filled tin after tin with gorgeous home made biscuits (cookies for you American folk).
 
My favourites were:
  • afghan biscuits - delicious chocolate treats with sweet chocolate icing and a piece of walnut (never figured the walnut thing out, we always took it off to eat them)
  • hokey pokey biscuits - delightly soft and chewy golden syrup morsels, popped onto the tray as balls and squished down with a fork, they look and taste so wonderfully home-made
  • melting moments - which did what it said on the tin, and 'melted' delicately in your mouth. The trick was to shove the whole biscuit in, and let it dissolve while munching - a bit gross if you were watching, but hey, we were kids, and we didn't care (actually I still don't when it comes to scoffing bickies)
  • and finally, shortbread, so soft and buttery and divinely crumbly (mum would cut it into squares - I like to cut it into shapes, but then I don't have 6 kids to deal with and clean up after, so have lots more time)

It was the little chefs last day at nursery and school this week, so the 3 of us baked the teachers thank you gifts. Actually little chef number 2 got bored in the first 5 minutes so he went upstairs to play the Wii, followed about 10 minutes later by little chef number 1. That's ok, as much fun as it is baking with them, it's a teensy bit slower, and I had a lot to cook. I had so much fun recreating my favourite biscuits. I dusted off the Edmonds cookbook, a NZ institution - every household has one, so all credit for these recipes goes to the Edmonds team. I plugged in my fire engine red Kitchen Aid (I love my KA) and baked the afternoon away.
 
So here's the recipes.
 
Afghans
  • 200 grams butter
  • 1/2 cup sugar
  • 1 1/4 cups flour
  • 1/4 cup cocoa
  • 2 cups cornflakes
Method
  1. Cream butter and sugar until light and fluffy
  2. Sift flour and cocoa together and stir into creamed mixture
  3. Fold in conflakes and put mounds of mixture onto a tray lined with baking paper
  4. Bake at 180 degrees celcius (350 degrees fahrenheit) for 15 minutes.
  5. When cold ice with chocolate icing - mix 2 cups icing sugar with 2 tablespoons water and 1 tablespoon cocoa
 
Hokey Pokey biscuits
  • 125 grams butter
  • 1/2 cup sugar
  • 1 tablespoon golden syrup
  • 1 tablespoon milk
  • 1 1/2 cups flour
  • 1 teaspoon baking soda
Method
  1. Heat butter, sugar, golden syrup and milk in a pot until butter is melted and mixture is nearly boiling, remove from heat and allow mixture to cool to lukewarm
  2. Sift flour and baking soda together and add to cooled mixture, mix well
  3. Roll tablespoons of the mixture into balls and place onto a try lined with baking paper. Flatten with a fork
  4. Bake at 180 degrees celcius (350 degrees fahrenheit) for 15 to 20 minutes until golden brown.
 
Melting Moments
  • 200 grams butter, softened
  • 3/4 cup icing sugar
  • 1 cup flour
  • 1 cup cornflour (cornstarch)
  • 1/2 teaspoon baking powder
  • buttercream icing or raspberry jam
Method
  1. Cream butter and icing sugar until light and fluffy
  2. Sift flour, cornflour and baking powder together and mix into creamed mixture, stirring well
  3. Roll dough into small balls the size of large marbles and place on a tray lined with baking paper, flatten slightly with a fork
  4. Bake at 180 degrees celcius (350 degrees fahrenheit) for 20 minutes.
  5. Cool and sandwich two biscuits together with buttercream or raspberry jam
oops - no photo here, there aren't any left over - excuse me while I wipe the crumbs off my chin.
 
 
Shortbread
  • 250 grams butter
  • 1 cup icing sugar
  • 1 cup cornflour
  • 2 cups flour
Method
  1. Cream butter and icing sugar together till light and fluffy
  2. Sift flour and cornflour together and mix into creamed mixture
  3. Knead well
  4. Roll out to about 1.5 cm thickness (it mightn't roll well, mine started to break apart, so as I rolled it, I squidged it together)
  5. Cut shapes out or cut into squares, pop onto a tray lined with baking paper, and prick all over with a fork
  6. Bake at 150 degrees celcius (290 degrees fahrenheit) for 30 minutes until golden brown

I packed them all into jars and popped labels on, this one was for little chef number 1's  teacher Mrs Daniels - a great big thank you.

Good Morning Vietnam

I know I know, the title is a cliche, but so appropriate, it's 6am in the morning, and I've just popped two onions and some ginger on the barbeque. It's not your usual hour to fire up the grill, but I have a hankering for a bowl of pho. It was my staple breakfast throughout Vietnam, and roasting the onion and ginger is the start to creating the divine stock that forms the basis of the soup.

I loved Vietnam - the crowds, the temples, the beaches, the sounds, even the crazy motorbike drivers (well maybe not), but everything else was fabulous. It's a country that overwhelms the senses, constant noise, vibrant colours and interesting smells, and the food (especially street food) is so much a part of the ambience. The food is prepared quickly, noisily, the colours are so bright they look photo-shopped, the smells are intoxicatingly heavenly and the tastes are a beautiful balance of salty, sweet, sour and spicy.

Walking the streets of Vietnam, I was fascinated by the women carrying the “don ganh” (or yoke), In the baskets attached they carried a portable kitchen and restaurant - in one basket a charcoal grill, with a large pot of simmering stock. In the other stacked bowls of noodles, fresh herbs, sliced meat, spoons, bowls and cups, and plastic stools. They stopped on demand and set up shop, delivering a fabulous tasteful bowl of Pho (a rich noodle soup, laced with fragrant herbs, and finished with lime and chillies to taste).


My favourite place to eat was the market - try it if you're ever in Vietnam. Head to the local market, sit yourself down on a rickety plastic stool, and get ready to have a taste experience you‘ll love. You’ll be encouraged (vigorously so) to try everything, and as cheap as it is why not, from freshly made spring rolls in Ho Chi Minh City, to Ban Xeo (steamed dumplings) in the historic and beautiful town of Hoi An, and the famous Pho (noodle soup) found all over Vietnam and cooked to perfection in Hanoi, the food will simply astound you.

Chicken Pho
(If you don't fancy making the stock from scratch, use 2 litres of a good quality stock, add 3 tablespoons fish sauce, 1 tablespoon palm sugar, 2 tablespoons coriander seeds, 4 whole cloves and 1 bunch of chopped coriander)
If you have the time though, give it a go, the taste of the stock is phenomenal.
  • 2 brown or white onions, unpeeled
  • 10cm piece of ginger, unpeeled
  • 2 kilos whole chicken
  • 1.5 kilos chicken bones (backs or thighs)
  • 1 tablespoon salt
  • 3 tablespoons fish sauce
  • 1 tablespoon palm sugar
  • 2 tablespoons coriander seeds, toasted in a dry pan for 1 minute until fragrant
  • 1 small bunch coriander
  • 1 packet of rice noodles, soaked in warm water for 20 minutes
  • 2 cups shredded chicken (from the chicken cooked in the stock)
  • 4 spring onions, finely sliced
  • 1/3 cup chopped coriander
  • 3 cups beansprouts
  • small bunch of mint
  • small bunch of thai basil, leaves only
  • 3 small chillies, deseeded and sliced thinly
  • 3 limes, cut into wedges
Method 
Make the stock
  • Place the onions and ginger on the barbeque, or under the grill, and cook until skin is charred, turning frequently, this takes about 15 minutes. Remove from heat and cool.
  • Rinse the cooled onions under warm running water, rubbing off the charred skin, cut in half. Peel the skin from the ginger and chop ginger in half lengthways
  • Rinse the chicken under cold water, using a big knife, make bone cuts every two inches on the chicken, this releases the bone marrow and adds flavour to the stock
  • To make a clear stock, parboil the chicken first - cover the whole chicken and chicken pieces with water in a stockpot, bring to the boil and boil for 5 minutes. Dump into the sink and rinse the chicken pieces and chicken.
  • Pop back into the pot and add 6 litres of water, and bring back to the boil, skim off any scum that floats to the top. Add the onions, ginger, salt, fish sauce, sugar, coriander seeds, cloves and coriander and cook uncovered for 30 minutes.  
  • Remove chicken, cool slightly, remove the breasts and chop off the legs. Cover and refrigerate. Put the carcass back into the pot with the bones and simmer stock gently for about 1 1/2 hours
  • Strain through a fine mesh sieve lined with muslin cloth and set aside
Putting the bowls together
  1. Bring the stock to the boil
  2. Place a portion of noodles on a mesh strainer and dunk the noodles in the stock for 20 seconds until they collapse. Pop into a bowl, top with the green onions, sprouts and coriander
  3. Place shredded chicken on top, and ladle the stock on top of the noodles
  4. Serve immediately and add the mint, thai basil, chillies and limes to taste


I've lost a suitcase!

It's school holidays, we're in Dubai with the kids, and I just had to share a serious AHA moment. I jumped on the scales with the suitcase we'd packed for Dubai to check it's weight - you know the drill, weigh the suitcase and you, then just you and work out the difference....well the AHA moment came when me and the suitcase weighed about the same as I did 18 months ago - I HAVE LOST THE SUITCASE! how awesome is that?! I picked it up several times and can't even imagine carrying that horrible heavy thing around with me all the time. Thank you to my fabulous fat fighters (a bunch of lovely ladies I met two years ago with a mission to lose weight), I couldn't have done it without you (and that bloody treadmill). For those that haven't seen me in a while, here's the before headshot


and my current one


I've also discovered through Nicole from Art of Abundant Living (check her website out, http://www.artofabundantliving.com/ - she's fab!) that it's not all about counting calories or fat grams - it's about the quality and nutritional benefits that food delivers, so I'm going organic, where I can with ingredients in Doha, and eating lots of wholegrains, nuts and pulses - the kids aren't impressed, but small steps with them.

I know, I know - enough of the tree hugging hippy stuff, I'll be eating mungbeans next and smelling up the house with patchouli oil. So here's a couple of fabulous healthy, low fat recipes. The first is steamed chicken dumplings, I freeze these and then reheat in a steamer for a few minutes for a quick appetiser for dinner. The second is an easy recipe for tabouleh - it's quick to make and keeps for a few days in the fridge, so I mix it with all sorts of chopped vegetables, olives, chickpeas and cooked pasta for a delicious salad at lunchtime.

Happy Cooking
Gill


Chicken Dumplings
  • 1 packet of gyoza wrappers
  • 250 grams minced chicken or prawns (or pork if you've got it, you lucky thing)
  • 2 cm piece of ginger grated
  • 1 clove garlic minced
  • 1 tablespoon cornflour
  • 2 tablespoons soy sauce
  • 2 green onions, chopped finely
  • 1/4 cup cabbage, chopped finely
  • 1/2 teaspoon sesame oil
Method
  1. Mix all of the ingredients except gyoza wrappers together
  2. Place a teaspoon of the mixture onto a gyoza wrapper.
  3. Dip your finger in water and wet the edges of the gyoza wrapper
  4. Fold in half (so it looks like a semi circle) and bring the edges all of the edges together and give the top a little twist
  5. Place on baking paper in a bamboo steamer and steam for 6 -7 minutes until cooked
  6. Make a dipping sauce with 100mls soy sauce, 50 mls malt vinegar, 1 teaspoon sugar, 1 chile deseeded and chopped and one clove of garlic minced


Tabouleh
  • 3/4 cup fine grain bulgar wheat
  • 2 large tomatoes, chopped
  • 1 medium onion, finely mince
  • 2 big bunches parsley
  • 1 teaspoon salt
  • 1/2 teaspoon white pepper
  • 1/4 cup fresh lemon juice
  • 3 tablespoons olive oil
Method
  1. Soak the bulgar in a large bowl of warm water for about an hour
  2. Deseed and peel the tomatoes and chop finely
  3. Drain the bulgar into a colander lined with a clean teatowel, squeeze as much water out of it as you can.
  4. Drain any water from the tomatoes

  1. Mix all of the ingredients together, add more lemon juice and/or olive oil if needed

Hainanese Chicken Rice

We all have comfort foods, those foods that we turn too when we want to enjoy the flavours, but also bring back the sounds, smells and tastes of some fantastic memories. I spent a long time in South East Asia, and I love the crisp clean flavours, I close my eyes and I can see the vivid colours - red chillies, green limes, vibrant coriander and delicate crystals of palm sugar. I can smell the galangal, the sharpness of lemongrass, the hint of aniseed in thai basil, and the nose wrinkling pungency of fish sauce. And one of my most favourite dishes is Hainanese Chicken Rice, it's a delicate blend of ginger and green onion stuffed chicken, poached in water with a hint of sesame oil, and served with garlic & ginger rice, and hot chilli sauce, both made with the liquid the chicken is poached in. It's a simple, peaceful dish, it doesn't need powerful flavours and it doesn't pretend to be anything that it isn't. It just is!

for the chicken,
  • 1 whole chicken, about 1.8 kgs
  • coarse salt
  • 2 large thumbs (8cm long) ginger, sliced
  • 4 spring onions, chopped into 2cm pieces
  • 1 teaspoon sesame oil
the rice
  • 2 tbsp vegetable oil
  • 3 cloves garlic, minced
  • 2 cm piece of ginger, grated
  • 2 cups basmati rice, washed and rinsed
  • 2 cups of the chicken stock that the chicken was cooked in
  • 1/2 teaspoon sesame oil
and finally the chilli sauce
  • 1 tablespoon lime juice
  • 3 tablespoons of the chicken stock the chicken was cooked in
  • 2 teaspoons sugar
  • 4 tablespoons hot chile sauce
  • 4 cloves garlic, grated
  • 2cm piece of ginger, grated
  • a generous pinch of salt, to taste
 Method
  • Scrub the outside of the chicken with the coarse salt to remove any residue on the skin, rinse thoroughly.


  • Stuff the chicken with the ginger slices and spring onions.


  • Pop it into a large stockpot and cover with water, and add the sesame oil. Bring it to the boil and then turn down and simmer. Skim the froth of the top of the water. Cook for about 45 minutes until chicken is done. Remove chicken and reserve the stock. Keep the chicken warm wrapped in tinfoil


  • For the rice, place the oil and garlic and ginger in a pan and heat on medium heat until garlic and ginger are sizzling, Add the rice and sesame oil and cook for 2 minutes. About now, I'm in heaven with the smells from the rice, yummmm!


  • I now pop this mixture into the rice cooker with the chicken stock and cook. To make it in a pot, add the stock and bring to the boil, lower the heat and pop the lid on. Cook for 10 minutes, take the pot of the heat leaving the lid on and set aside for 10 minutes to absorb the rest of the liquid.
  • For the chile sauce, put all of the ingredients into a blender and blitz.
  • Heat the remaining stock for soup
  • Slice the chicken ready to serve. Serve the chicken with the rice, the chile sauce and the rest of the stock.


And enjoy!

A mixed bag this week

It's been a busy couple of weeks, I morphed into a crazy cookie lady, baking and decorating a couple of hundred cookies for Valentines Day. I have to show off my favourites, see!


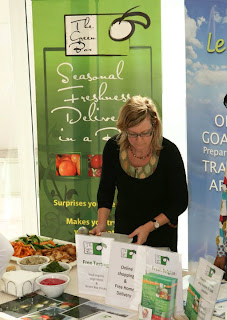
I also made a bunch of dips to showcase the organic vegetables that The Green Box (www.the-box.me) gets from a local farm here in Qatar, and we went out to see the farm last week - the kids had a great time riding around on bikes, and I loved walking around the farm picking and eating organic cucumbers and tomatoes straight from the vine. Here I am at a Health and Wellness Fair, don't the dips look fab!


Here's the recipe for the beetroot dip, so simple, but absolutely delicious, and great with Arabic bread or chopped veges. You can also make it with drained, canned beetroot as well.
 
Beetroot Dip 
  • 5 beetroot, washed
  • 1 1/2 cups yoghurt
  • juice of a lemon
  • 2 cloves of garlic, minced
  • 1/2 teaspoon of ground cumin, ground coriander, paprika
  • 1/4 teaspoon cinnamon
  • 2 tablespoons olive oil
  • salt and pepper to taste
 
Method
  1. Boil the beetroot for 45 minutes until cooked, cool and peel (use plastic gloves, unless you like your hands a lovely blush shade of red)
  2. Pop them into the food processor and blitz until smooth
  3. Add the rest of the ingredients and blend well.
 
And finally...I struggle to find healthy tasty meals that the kids will enjoy, but struck a winner this week with a simple lightly spiced cajun chicken pasta. You can use sundried tomatoes, or in my case, I had some tomatoes in the fridge that I dried in the oven last week (I know...I'm a bit of a girlie-swot when it comes to the kitchen). They're really easy though, so do try them, and they're not slathered in oil like the supermarket kind - cut the top off 20 tomatoes, cut them in half, sprinkle with sea salt and pop them cut side up on a baking rack (with a tray beneath it) in the oven, put the oven on the lowest setting you can, and leave them there for between 6 and 12 hours, mine were quite large, so they took 12 hours. They keep for weeks in the fridge.


And here's the pasta recipe, I used a short pasta, but think it would be amazing over some thick long parpadelle.
 
Cajun chicken Parpadelle
  
2 medium chicken breasts, cut into thin strips 
2 cloves garlic minced
2 teaspoons cajun seasoning
2 tablespoons butter
1 teaspoon olive oil
2 spring onions, thinly sliced
1/2 cup cream
1/2 cup milk
2 tablespoons chopped sun dried tomatoes
1/4 teaspoon salt
1 tablespoon fresh basil, chopped 
ground black pepper
grated parmesan cheese to top
  
Method
  1. Heat the oil and butter in a pan over medium heat and stir fry chicken for 5 minutes until almost cooked, add cajun seasoning, spring onions and garlic and cook for 1 minute
  2. Add cream, milk, sundried tomato and cook for a few minutes until sauce has started to thicken, add fresh basil and ground pepper and salt, and stir
  3. Serve over cooked long pasta, like parpadelle or fettucine - add the pasta to the pan and toss till all of the pasta is coated in the sauce, serve topped with parmesan cheese

Little Chef's

I'm not the only one in the house that loves cooking - I have two little chefs who enjoy mixing, stirring, chopping, and most importantly, eating. So this week we spent lots of time in kitchen making cakes and cookies, and I just have to share little chef #1 cooking up some fabulous butterfly cakes. I tried to convince her to make banana cakes - I was thinking about the school lunchboxes the next day, but I couldn't turn those puppy dog eyes down when she wanted to cook chocolate cake.  I'd share the recipe, but really... it's on the box. Yep, I'll admit it, when it comes to kids and chocolate cakes, cooking with Betty (Crocker that is) is the way to go.

So here's little chef#1 breaking eggs, don't you love the chef's hat!


And pouring the batter after mixing


And her favourite part, didn't we all love this bit when we cooked with mum


and the finished product - how cool are these


They didn't last long!  The butterfly pan was my christmas present from the little chefs, painstakingly picked out amongst all the other cooking stuff at my favourite kitchen store - I love how much thought went into it.

Pad Thai

One of my favourite weekday meals is Pad Thai  (actually its one of my favourite meals any day of the week) - google it and you'll find a plethora of recipes. A good pad thai can be cooked in 5 minutes, and is the just the right heavenly mix of salty (from the fish sauce), sweet (from the sugar), spicy (from the chillies) and sour (from the tamarind and lime). 
 
Before you start to cook the pad thai, have everything chopped and ready to go. I like to keep my pad thai simple and I only ever cook one or two servings at a time, so that the wok stays really hot. I made the pad thai sauce earlier this week and popped into a big jar in the fridge, and it will keep for a few months - though never that long in my house, as I use it up fairly quickly.  I like prawns in my pad thai, but I also find it great for using up leftovers, so will pop shredded cooked chicken, and random vegetables in there (particularly for the kids). One of my biggest gripes about stirfrying is that the pan has to be so hot, the garlic and shallots can burn and become bitter, so here's a quick tip, pop the garlic and shallots into cold oil and then put the pan on to heat - as the oil heats, the garlic and onion will infuse flavour into it without burning.


Pad Thai
Serves 2 
 
Pad thai sauce
  • 1/2 cup tamarind concentrate (the runny stuff in a jar)
  • 1/2 cup palm sugar
  • 1/4 cup fish sauce
 
Pop tamarind sauce, palm sugar and fish sauce into a pot and heat over medium heat, stirring, until sugar has dissolved. Pop into the fridge.
  
  • 5 tablespoons pad thai sauce (or to taste, if you like it more saucy, pop more in)
  • 2 tablespoons vegetable oil
  • 3 cloves garlic, minced
  • 1 shallot, or 1/2 small red onion, finely chopped
  • 1/2 teaspoon chile powder (or to taste)
  • 2 eggs
  • 1/2 cup chopped spring onions
  • 1/2 cup beansprouts
  • 200 grams prawns, peeled and deveined
  • 200 grams rice noodles
  • chopped peanuts
  • 1 lime, halved
  • coriander to garnish (not traditional, but yum)
  • chopped chillies to garnish
 
Method
  1. Soak the rice noodles in warm (not hot) water for 10 - 15 minutes. You're looking for the rice noodles to free up, but still be fairly firm. It's better to undersoak then oversoak, as you can add water to the wok to cook the noodles more if needed
  2. Put oil, garlic and shallots into a cold wok, or pan, and heat to a high heat. When the garlic starts to sizzle, add the drained noodles, pad thai sauce, chile powder and prawns
  3. Stir constantly over a high heat for a few minutes until noodles soften and prawns are cooked.
  4. Push noodles to the side and break in the eggs, scramble with the stirrer and when almost cooked, pop the noodles on top of the egg to finish off the cooking (about 1 to 2 minutes)
  5. Add beansprouts and spring onions and stir for another minute, serve with a squeeze of lime, and garnish with peanuts, coriander and chopped chillies.

Time on my hands

I've had a lazy hazy week or two, lots on, but loads of time for cooking as well. I had a great morning outdoors at the lagoon teaching a group of lovely ladies how to cook some simple tapas - delicious chicken meatballs in sofrito sauce (basically a spanish tomato sauce loaded with smoked paprika) & eggplant, capsicum and sundried tomato rolls served with a rich garlicky coriander salsa.

I turned a glut of courgette into zucchini and tomato chutney which tastes divine (even if I say so myself), and will be fabulous in a few weeks when all the flavours have meshed together and the vegetables smoosh down into a jam-like consistency, and finally I remembered I had some lemon curd and christmas mince in the fridge, so threw together a bit of pastry, and made some bite size xmas mince pies and lemon meringue tarts (recipe below). Please excuse the photo, I only had my iphone, so the quality isn't fantastic, but it shows you how they looked and in case you're wondering - the pies were delish!


Lemon Meringue Tart
makes one medium size tart, or 24 mini tarts.

Pastry

  • 1  1/2 cups flour
  • 1/2 cup cornflour
  • 1/2 teaspoon salt
  • 1 tablespoon caster sugar
  • 180 grams cold butter, cut up
  • 1/4 cup cold water

Pop the flour, cornflour, salt and caster sugar into a food processor, add cold butter and blitz until the mixture looks like breadcrumbs. With the processor running dribble in the cold water until the pastry start to comes together, tip onto the bench and squish together into a ball, cover in plastic wrap and pop in the fridge for 30 minutes

Lemon Filling
  • 1/4 cup cornflour
  • 1 cup sugar
  • grated rind from 1 lemon
  • 1/2 cup lemon juice
  • 3/4 cup water
  • 3 eggs, separated (keep the whites for the meringue)
  • 1 tablespoon butter

Blend cornflour, sugar, eggs, lemon rind and juice together until smooth, Add water and cook in a bowl over a pot of simmering water, whisking continually until mixture thickens (about 5 minutes). Remove from heat and add in butter.

Meringue
  • 3 egg whites from above
  • 1/4 cup caster sugar
  • 1/2 teaspoon vanilla essence

Beat egg whites until stiff, beat in sugar 1 tablespoon at time, until thick and glossy, stir in vanilla essence.
And now comes the fun part - roll out the pastry to 5mm thick, Line a 20 cm pie plate, trim off excess pastry and bake blind (pop baking parchment on the pastry and fill with rice) at 190 degrees celsius for 20 minutes. Pour lemon filling into the pie base, and spoon meringue filling over the top. Return to oven and bake for 10 minutes until meringue is golden.
(for mini tarts, cut out circles of pastry, pop into mini muffin pans, prick all over with a fork and bake for 5 minutes, before adding filling and meringue)

New Years Resolution: write a blog!!!!

It's the New Year, the kids are back to school and I don't have any cooking lessons or catering this week, so it's time to create my first blog. I'm excited and nervous at the same time.  I won't go into details about who I am as you'll find that in the 'who am I section' (seriously!). Let's get straight to the food. I cooked up such a storm of rich traditional food over Xmas that I'm craving easy light dishes rich in healthy vegetables. Last night we had a fabulously simple fried rice packed full of crunchy celery, crisp capsicum, tasty spring onions, tender chicken (from www.the-box.me/), and my one true indulgence in Qatar - fresh free range eggs (expensive but worth it).  Lightly seasoned with garlic, soy sauce and white pepper, it was delicious and made with leftover rice in the fridge, and pre-cooked chicken, it was on the table in 15 minutes. My biggest coup however was that the kids actually ate it. Now that's my idea of an easy meal, so easy I didn't take a photo, I must remember to keep my camera handy. Keep coming back to visit my blog for more tantalising recipes in the coming days, weeks and months...

Easy Fried Rice
(serves 2 adults and 2 kids)
  • 3 cups cooked rice, seperate the grains
  • 1 double chicken breast (about 400 grams), pre-cooked and shredded
  • 2 rashers of bacon, chopped
  • 3 spring onions - sliced
  • 2 cloves garlic, minced
  • 1 stalk of celery, finely chopped
  • 1 red capsicum, chopped finely
  • 3 tablespoons light soy sauce
  • 2 free range eggs
  • 2 teaspoons vegetable oil
  • 1/2 teaspoon ground white pepper
  • chopped chillies
 
Method
  1. Beat the eggs lightly, heat 1 teaspoon oil in a non stick pan over medium heat, add eggs and swirl around until eggs cover the bottom of the pan, cook for a minute until bottom is set and flip eggs over, cook for about half a minute, remove and chop with a knife
  2. Reheat pan and add remaining oil, add bacon and cook for 2 -3 minutes until bacon is cooked, add garlic and spring onions, celery and capsicum, cook for  two minutes
  3. Add rice, soy sauce, and pepper and cook until rice is piping hot, add eggs and cook another minute
  4. Serve topped with chopped chillies if you fancy it spicy